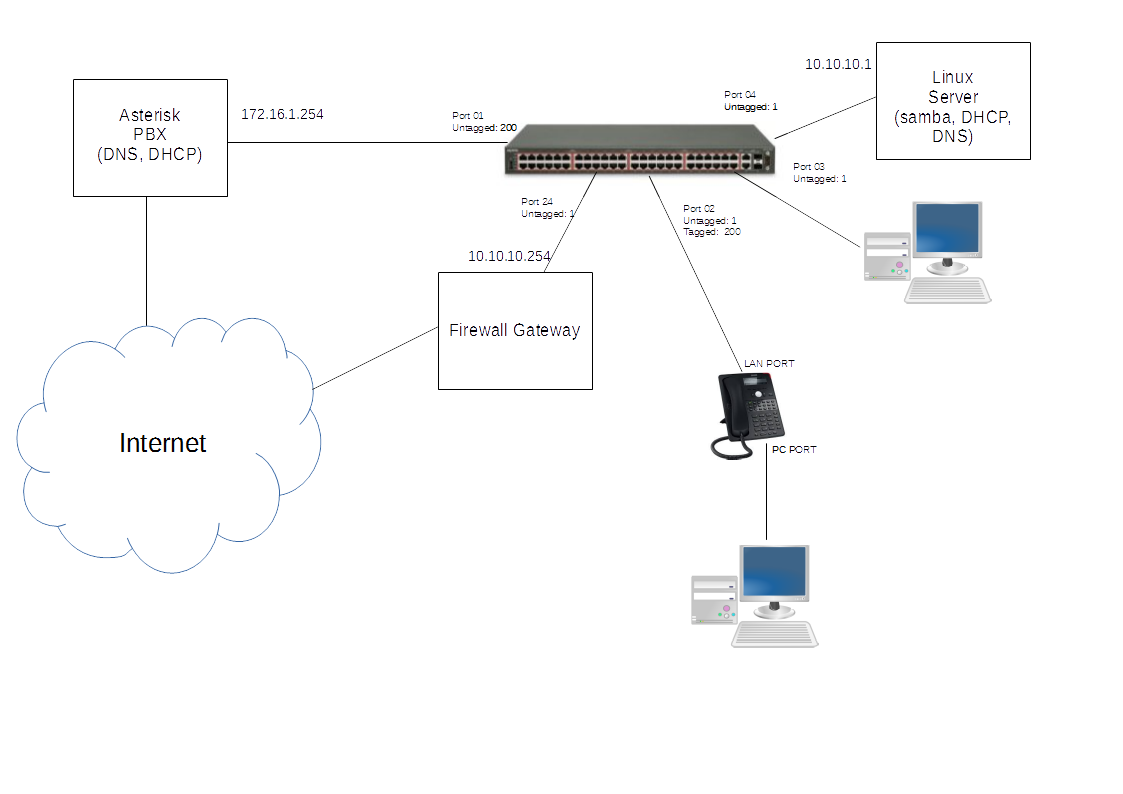
 In this part I’ll show the configuration steps to obtain the situation in this network schema. This is a really simple and real situation: a simple network using two separated VLAN one for Data and the other for Voip.
Att.: In this example for to keep everything simple, clear and practical we’ll use Asterisk PBX and Snom IP Phone, but the same considerations apply to other brands.
Att.: Generally it’s important that we separate the voip traffic from the data traffic so we’ll utilize two different VLANs: one VLAN will carry the data traffic destined to the desktop and server and the other will carry only the Voip/voice traffic.
Voip Network address: 172.16.1.0/24
Data Network Address: 10.10.10.0/24
Voip PBX with DHCP and DNS: 172.16.1.254
Linux Server DNS, SMB, DHCP Server for data VLAN: 10.10.10.21
Firewall/Gateway for data VLAN: 10.10.10.254
Data VLAN: 1
Voip VLAN: 200
The Voip PBX it is connected with another ethernet card directly to WAN/Internet, to have the maximum perfomance and quality for Pbx Voip trunk connected to ITSP (Internet Telephony Service Provider). In this manner all the phone and other device in Voip VLAN can use directly the Asterisk server like gateway to have internet access (you have to configure iptables accordingly). Another solution can be to use layer 3 routing directly inside the switch, but in this case I preferred use this solution.
Att.: Of course it is mandatory to configure carefully the firewall inside the asterisk linux server !
In the same linux server we can configure DNS and DHCP server for Voip VLAN.
Example DHCP config
range: 172.16.1.10 -> 172.16.1.100
gateway: 172.16.1.254
Linux Server offer DNS, SMB, DHCP Server for data network
Example DHCP config
range: 10.10.10.10->10.10.10.100
gateway: 10.10.10.254
Port 02
Here we’ll use only 1 switch port to connect desktop and ipphone.
Snom ip phone have 2 LAN plug: one to be connected to switch (named LAN port) and the other to desktop (named PC port).
There are some special considerations when desktops are physically connected to the PC port on back of an IP phone (in our example Snom ip phone, but with other models it is same) and then the IP phone is connected to the switch: in this scenario the common approach is to tag the voice VLAN while leaving the data VLAN untagged.
The desktop won’t be configured for tagging so it won’t understand an 802.1Q tagged frame (in our case VLAN 200): when the desktop will receive a tagged frame will just discard.
The IP Phone will be configured to use only tagged frame (VLAN 200), and the other frame received in LAN port will be re-transmitted to pc port.
Port 01
The asterisk server must be able to reach the Voip VLAN directly without using any tag.
Port 03
Here the desktop is connected directly to the switch, and must be able to reach only the data VLAN.
Switch Configuration
VLAN->VLANs->Basic
Using insert add a new VLAN
Id: 200
Name: VLANVOIP
Type: Byport
VLAN->VLANs->Ports-> Port01 (Asterisk PBX)
VlanIds: 1
Discard Untagged Frames: False
Filter Unregistred Frames: True
Default VlanId: 200
Tagging: untagAll
VLAN->VLANs->Ports-> Port02 (Desktop + Ip Phone)
VlanIds: 1, 200
Discard Untagged Frames: False
Filter Unregistred Frames: True
Default VlanId: 1
Tagging: untagPvidOnly
VLAN->VLANs->Ports-> Port03 (only Desktop)
VlanIds: 1
Discard Untagged Frames: False
Filter Unregistred Frames: True
Default VlanId: 1
Tagging: untagAll
VLAN->VLANs->Ports-> Port04 (Linux Server for data VLAN)
VlanIds: 1
Discard Untagged Frames: False
Filter Unregistred Frames: True
Default VlanId: 1
Tagging: untagAll
VLAN->VLANs->Ports-> Port24 (Firewall/Gateway for data VLAN)
VlanIds: 1
Discard Untagged Frames: False
Filter Unregistred Frames: True
Default VlanId: 1
Tagging: untagAll
IP Phone Configuration
Advanced -> QOS/Security
VLAN ID: 200
That’all !
Linkografia
Michael McNamara – untagAll vs tagAll on Avaya Ethernet Routing Switches
 Follow